Eyebrows frame your face, enhance your expressions, and can completely change your look. If your brows are too light, sparse, or simply don’t match your hair colour, eyebrow dyeing at home is an affordable and easy solution. With the right products and careful steps, you can achieve natural-looking results without spending on salon visits.
In this guide, we’ll walk you through everything you need to know about dyeing your eyebrows at home – from preparation to aftercare.
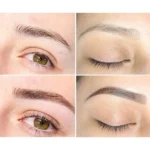
Why Dye Your Eyebrows?

- Enhance definition: Darker brows give your eyes more depth and shape.
- Match your hair colour: Ideal after changing hair shades (blonde to brunette, etc.).
- Save money and time: Avoid regular salon appointments.
- Longer-lasting than makeup: Tint can last 3–6 weeks compared to daily brow pencils.
What You’ll Need
Before you start, gather these essentials:
- Eyebrow dye kit (choose a shade close to your natural hair colour)
- Cotton pads and swabs
- Petroleum jelly (for skin protection)
- A small angled brush or applicator
- Clean spoolie brush
- Timer or clock
- Mild facial cleanser
Step-by-Step Guide to Dye Your Eyebrows at Home
Step 1: Choose the Right Dye
Pick a product specifically made for eyebrows (not hair dye, which is too harsh). Popular options include cream-based or henna eyebrow tints. Always perform a patch test 24 hours before applying.
Step 2: Prep Your Brows and Skin
- Cleanse your eyebrows to remove oils and makeup.
- Apply a thin layer of petroleum jelly around your brows to protect your skin from staining.
Step 3: Mix the Dye
Follow the instructions on your eyebrow dye kit. Usually, it involves mixing a colour cream with a developer. Prepare a small amount, as you don’t need much.
Step 4: Apply the Dye
- Use a spoolie to brush your brows into shape.
- With an angled brush or applicator, carefully apply the dye in the direction of hair growth.
- Start from the inner brow and work outward for even coverage.
Step 5: Wait and Time It Right
- Leave the dye on for the recommended duration (usually 5–10 minutes).
- For a lighter tint, wipe off sooner. For a bolder look, leave it closer to the maximum time.
Step 6: Remove the Dye
- Use a damp cotton pad to gently wipe off the dye.
- Rinse with lukewarm water and mild cleanser to remove any residue.
Step 7: Style and Check
Brush your brows back into place with a clean spoolie. Check the colour in natural light – you can always reapply for a slightly darker shade.
Aftercare Tips
- Avoid scrubbing or exfoliating your brows for 48 hours.
- Skip oil-based cleansers, as they fade the tint faster.
- Apply a nourishing brow serum or castor oil to keep hairs healthy.
Common Mistakes to Avoid
- Using hair dye on brows: This can cause irritation or even burns.
- Choosing the wrong shade: Too dark brows may look unnatural; stick to 1–2 shades darker than your hair.
- Leaving dye on too long: Overprocessing can damage brow hairs.
- Skipping a patch test: Always test for allergic reactions.
Frequently Asked Questions
1. How long does eyebrow dye last?
Typically 3–6 weeks, depending on your skin type and skincare routine.
2. Can I use henna to dye my eyebrows?
Yes, henna tints are natural and last about 2–4 weeks.
3. Is it safe to dye eyebrows at home?
Yes, as long as you use products meant for brows and follow the instructions.
4. What if my brows turn out too dark?
Cleanse with an oil-based makeup remover or gently exfoliate to fade the colour faster.
Final Thoughts
Dyeing your eyebrows at home is simple once you know the right steps. With proper preparation, careful application, and a little patience, you can enjoy fuller, defined brows that complement your face – all without a salon trip.
If you’re a beginner, start with a lighter tint and short processing time until you get comfortable. Soon, you’ll master the process and enjoy salon-quality brows from the comfort of your home.